Friday 2 December 2016

and there was cake...


Finnish Karelian piirakkaa are a favourite with Hazel's family at any time of the year.

  • Filling

  • 2 cups water
  • 1 cup uncooked rice
  • 2 cups milk
  • salt
  •  2 tbsp. butter
  • Rye Crust

  • 12 cup water 
  • 1 teaspoon
  • 1 cup rye flour
  • 14 cup plain flour
  •  1 tbsp. vegetable oil

  • Glaze
    • 12 cup of warm milk
    • 2 tbsp. butte
  • Egg Butter

    • 2 eggs, hard boiled and chopped
    • seasoning
    • 3 tbsp. soft butter


    1. For the Filling:
    2. In a saucepan combine the water and rice. Bring to a boil.
    3. Stir, cover, and cook over low heat for 20 minutes, stirring occasionally.
    4. Add the milk, cover, and continue cooking until the milk is completely absorbed and the rice is soft and creamy.
    5. Preheat oven to 220C
    6. Line a baking sheet with parchment paper.
    7. For the Pastry:
    8. In a medium-sized bowl, combine the water, salt, oil and rye and white flours to make a stiff dough.
    9. Shape the dough into a log and cut into 16 portions and shape each into a round.
    10. On a lightly floured board, roll out each round into a 6-inch circle.
    11. Spread about 3 tablespoons of filling evenly on each round.
    12. Fold two opposite edges of the pastry over the filling and crimp the edges of the dough toward the centre to make an oval-shaped pastry, allowing about 1/2-inch of the crust to overlay the filling and leaving the centre of the filling exposed.
    13. Place on the prepared baking sheet.
    14. In a small bowl, stir together the melted butter and hot milk and brush on the pastries.
    15. Bake for 10 to 15 minutes, brushing once during baking, until the pastries are golden on the edges.
    16. Remove from the oven and brush again. Cover with a clean tea towel.
    17. For the Egg Butter:.
    18. In a small bowl, cream the butter. Stir in the eggs.
    19. Season with the white pepper and salt.
    20. Cool the pastries and serve with the egg butter at room temperature.

    Stitching some hygge in time for Christmas

    Now that the darker evenings are here we are really getting into our stitching for the festive season. We love the idea of hygge, the Danish concept that seems to be becoming increasingly popular in the UK at the moment. A word without any real translation (pronounced 'hoo-gah') it describes that cosy, comfy feeling of being indoors with a roaring fire, candles, hot chocolate and family and good friends on a winter's day.
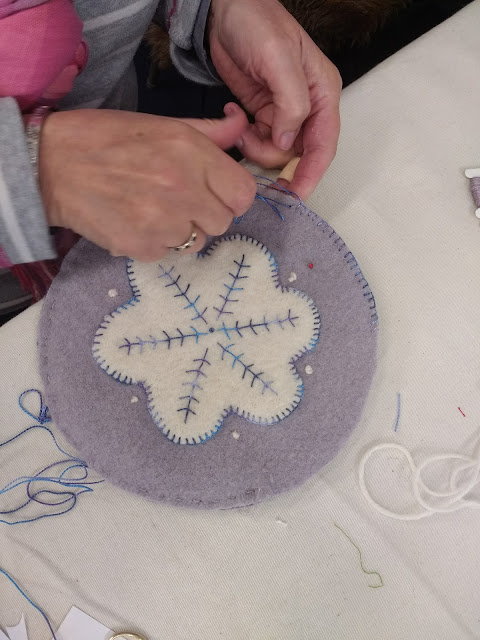
    Students visiting the studio today were treated to a Danish inspired workshop.  The day was spent designing and stitching a small cushion using colourful boiled wool felt.


    We've been saving old woollen blankets for years which we then dyed and felted in the washing machine (note to self: remember to clean out the trap after every wash...)

    InStitches friend, Anne Gallagher, was on hand to guide the students through the designing and stitching.  We'd first seen Anne's delightful woollen cushions when she was demonstrating at Farnham Maltings in January and knew instantly that they would be a great Textile Adventure!


    Anne brought lots of samples and ideas for us to try and before long everyone was rummaging through the piles of coloured blankets, cutting, snipping and stitching!


    Pippa added snow flakes to her holly and berries

    whilst Liz chose a variegated thread to add detail to her giant snowflake!

    Elizabeth enjoyed adding decorative stitching to each layer of her star,

    Ann started to stitch a Christmas woodland
    and the other Anne chose to decorate another snowflake


    But there's always one who decides to do it differently - Mavis chose a more summery colour scheme:  Warmer days to look forward too!

    Keeping with the Scandia feel we had 'pepper cookies' with our morning coffee, Karelian pirakka and egg butter with soup for lunch and finished off with a slice of warm Danish apple cake with a pot of tea;  recipes coming soon!


    Tuesday 4 October 2016

    And there was cake...

    By popular demand the 'and there was cake...' feature returns to the InStitches blog!

    Chocolate fudge cake


    A real 'can't go wrong' cake - very moist, and rises well.  For workshops I double the recipe and split it between 3 loaf tins and spread the fudge icing over the top.
     
    Ingredients:

    For the cake:
    6 ½ oz {165 g) plain flour
    2 level tablespoons (30 ml) cocoa
    1 level teaspoon (5 ml) bicarbonate of soda
    1 level teaspoon (5 ml) baking powder
    5 oz (125g) caster sugar                  
    2 level tablespoons (30 ml) golden syrup
    2 large eggs       
    ¼ pt (150ml) salad or corn oil
    ¼ pt (150ml) milk

    For the fudge icing:
    2 oz (50 g) butter
    4 level tablespoons (60 ml) cocoa
    3 tablespoons (45 ml) milk
    5 oz (125 g) icing sugar, sieved

    You will need a food processor and either 2 8 inch (20 cm) sandwich tins or one 8 inch (20cm) deep cake tin, lined with baking parchment.


    1.       Heat the oven to 170 deg. C. Gas No. 3. Grease and line the bottom of two 8 inch" (20 cm) straight-sided, sandwich tins with silicone paper.

    2.       Put the flour, cocoa, bicarbonate of soda, and baking powder into the food processor bowl.

    3.       Add the sugar and syrup, and the eggs, lightly beaten.

    4.       Put on the cover and remove the white plastic pusher: Switch on, and pour in the oil and milk, mixed, down the funnel into the bowl. Mix for about 5 seconds (count 5 slowly) after all the liquid is in.

    5.       Remove the bowl and knife from the machine, lift out the knife, and scrape clean. Turn the mixture into the prepared tins, and bake in the centre of the oven for 30-35 minutes, until the cakes spring back when lightly pressed with the fingertips. Turn out on to a wire rack to cool.

    6.       To make the icing: Melt the butter in a pan, add the cocoa, stir to blend, and cook for 1minute. Stir in the milk and icing sugar, and mix to smooth consistency. Leave to cool and thicken, Spread half the mixture between the two cakes, and the remainder on top. Decorate with broken chocolate flake, or grated chocolate.

    Words are not just for reading


    We were really excited to be able to offer an Exploring abstract letterforms workshop with Simon Sonsino last week and not only because we want to do it too! The textural qualities and sense of freedom from the conventions of calligraphy in his work speak to us and relate to our own textile work, where words and text are there for texture and interest but not necessarily meant to be read.


    It wasn't long before everyone was busily working away - Simon took us through a series of short exercises creating marks with different writing tools and objects.


    Who knew half a balsa stick could produce such exciting marks?


    Fortunately this was a calligraphy workshop was for the non-calligrapher, and didn't rely on straight lines, neat handwriting or legibility,


    It wasn't long before every available flat surface and notice board was covered with paper.


    It wasn't just sticks, we did get to try out a variety of different nibs


     and tried out many different alphabet styles


    and in different colours of ink.


     Even the dip water became an inspiration!


    The two days were fun and inspirational, here are a few of the resolved pieces.  I am sure that over the next week s and months several of us will be using the techniques on fabric too.


    To see some of Simon's work you can visit his web site by clicking here

    Wednesday 28 September 2016

    Make your mark!

    It was such a delight to welcome textile artist, Clive Barnett, as our very first guest tutor to the new studio.


    Throughout the two-day workshop Clive encouraged us to experiment and explore our own style of 'mark making'. The first day was spent printing with a discharge medium - who knew Finish dishwasher liquid could do that!


     We used a variety of techniques including masking tape resists,


    freezer paper stencils with a screen


    and monoprinting with acrylic sheets.


    We were hooked - and very busy!


    We needed to dry and iron the fabric before washing and ironing again to reveal our designs.


    Clive is a very warm and generous teacher and


    was always on hand to offer advice and inspiration when needed


    and when I found him ironing my samples I even asked him to come home with me!


    No InStitches Textile Adventure is complete without lunch


    and the studio has plenty of space for us to all sit down together.  But  as much as we'd like to go with Clive's suggestion of a small glass of wine to accompany lunch, we do need to have a productive afternoon!


    I think we managed that - judging by all the fabric flapping gently in the breeze!


     We were back the next day eager to get going with a bit more discharge before Clive managed to finally tidy it all away and start exploring stitched marks!


    It was inspirational hearing about and seeing Clive's own work.  There was such a lot of stitched mark making ideas for us to try out.


    These are a selection of Clive's pieces


    and I'm hoping the students will send us images of their work once it is completed.


    I used a leaf cut out on a couple of pieces, so I definitely want to try this stitch idea out on it.


    If you fancy a creative day out why not take as look at our web site and see what is coming us soon?  We would love to welcome you to our new creative space!

    http://www.institchestextilecourses.co.uk/


    Friday 23 September 2016

    Dreams can come true!

    For a long time we have dreamed of having our own textile studio one day and finally this week that dream came true!  Sunfield Studio opened for business this Wednesday after a manic summer getting everything ready. 


    If you follow us on Instagram or Facebook you'll have seen the occasional teaser photograph, but come and have a tour right now!


    We have padded height adjustable tables which are just the thing for printing and sewing on (and great for ironing on too), lots of light, big windows, air conditioning plus a door outside for when the weather is nice and we want to indigo dye!  Look closely, see the half wall, well behind there, for when it's not so nice out, we have a great wet area just waiting for dyeing to happen...


    We have made sure there's lots of equipment available for use,


    that's easy to find


    and don't you just love all the brayers hanging neatly on their hooks waiting for you?


    There are comfy chairs and brightly coloured stools,


    and of course the kitchen is well stocked and we promise there'll be something home baked in the tin too!


    We have added a library for you to peruse


    plus interesting things to stimulate the creative juices


    So what are you waiting for? - Come and see us soon, we can't wait to show you around our lovely new home!